Development envoirnment setup
Development envoirnment can be setup using either windows/linux. Currently, the setup focuses on Windows only.
Development environment setup happens according to the obytes template project given here. .
Step 1: React native development environment setup:
- Install chocolatey, follow the guide here.
- Open command promt as admin and install nodejs lts (20.9.0) and openjdk11. If other versions already installed switch to this version for this projects.
choco install -y nodejs-lts microsoft-openjdk11
Step 2 : Android Studio setup
- Download and install android studio, while installing make sure the following checkboxes are checked. Do not remove anything installed by default.
Android SDK
Android SDK Platform
Android Virtual Device
- Open android studio and from the main page click on more options, then SDK manager.
- Select the "SDK Platforms" tab from within the SDK Manager, then check the box next to "Show Package Details" in the bottom right corner. Look for and expand the Android 13 (Tiramisu) entry, then make sure the following items are checked:
Android SDK Platform 33
Intel x86 Atom_64 System Image or Google APIs Intel x86 Atom System Image
-
Next, select the "SDK Tools" tab and check the box next to "Show Package Details" here as well. Look for and expand the Android SDK Build-Tools entry, then make sure that 33.0.0 is selected.
-
Finally, click "Apply" to download and install the Android SDK and related build tools.
-
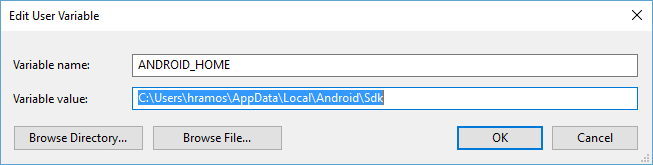
Add enviroment variable ANDROID_HOME.
- Open the Windows Control Panel.
- Click on User Accounts, then click User Accounts again
- Click on Change my environment variables.
- Click on New... to create a new ANDROID_HOME user variable that points to the path to your Android SDK:
 The SDK is installed, by default, at the following location:
You can find the actual location of the SDK in the Android Studio "Settings" dialog, under Languages & Frameworks → Android SDK%LOCALAPPDATA%\Android\Sdk
-
Add platform tools to path:
- Open the Windows Control Panel.
- Click on User Accounts, then click User Accounts again
- Click on Change my environment variables
- Select the Path variable.
- Click New and add the path to platform-tools to the list.
The default location for this folder is:
%LOCALAPPDATA%\Android\Sdk\platform-tools
-
On the home page, click on more options then AVD manager.
-
Select "Create Virtual Device...", then pick any Phone that supports google api's from the list and click "Next", then select the Tiramisu API Level 33 image. Note, the device takes a long time on the first launch.
-
Delete the other virtual device.
Step 3: Install other dependencies
For every command below open powershell as admin and run:
- git:
choco -y install git
- watchman
choco install -y watchman
- pnpm
npm install -g pnpm@8.6.5
- Sharp-cli
npm -g install sharp-cli@2.1.0
- VS Code
choco install -y vscode
Step 4: Permissions
Ask Admin to add you as a tester in google console (google login might not work without it)
Step 5: Clone and project setup
- Clone the git repo
git clone https://github.com/DefineX-Studios/MasjidBuddy
-
Ask another dev for
.env.developmentfile and place it incode\presentation\mb-client -
from repo root run
only on linux run,
chmod +x code/presentation/mb-client/android/gradlew
then,
cd code\presentation\mb-client
pnpm install
code .
- Then to run the project on emulator run,
pnpm android
- Next time, if you just want to start the expo server run
pnpm start
More info
when any native component is added you must run pnpm prebuild then reinstall the app with pnpm android