Local Supabase Server
Why?
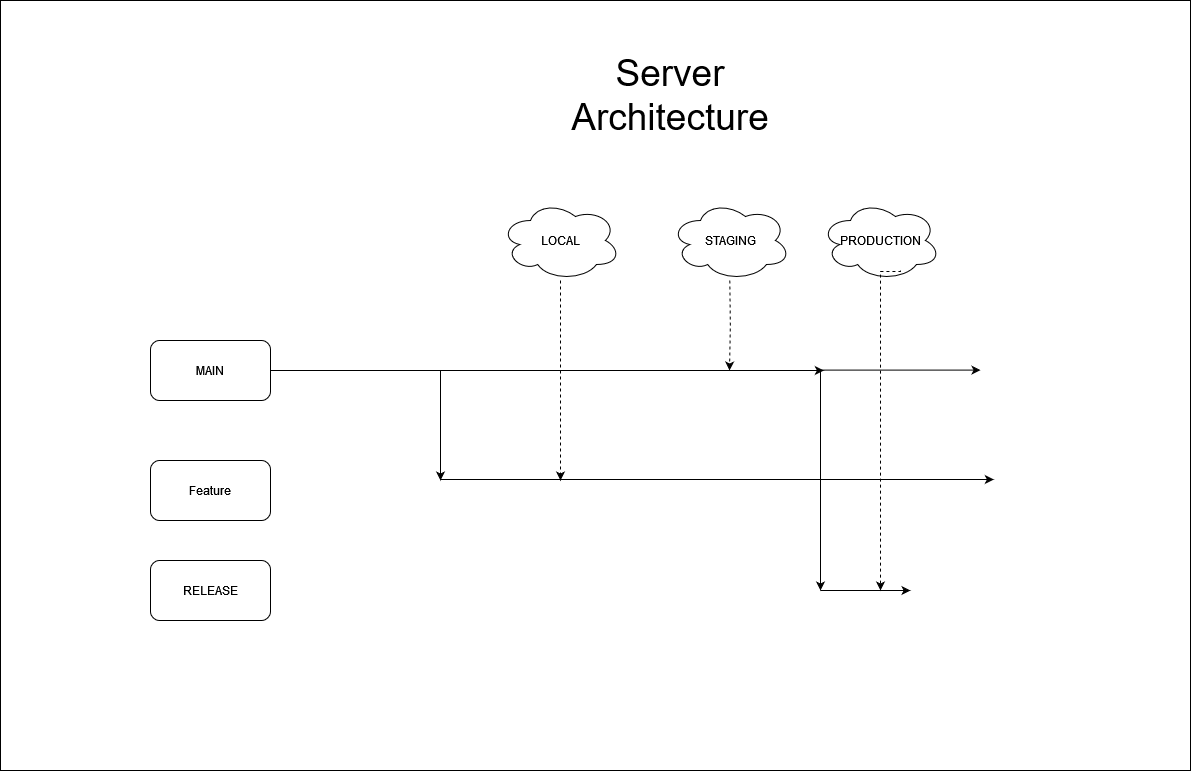
When working on a feature branch, we can't change the schema of staging/dev db as others testing or working on other branches might face conflicts. To avoid this issue, when working on a feature branch which requires changing schema of the db, local db server MUST BE USED. Once the feature branch is merged, staging/dev db should be migrated accordingly.
Explained in detail here
Server Architecture diagram
Setup
- Install Docker/Docker Desktop
- Install Supabase CLI (not the npm one)
-
npm install -g env-cmd - ask for .env file and place it into
code\backend\mb-supabase -
cd code\backend\mb-supabase -
env-cmd supabase start - replace the value of
api urlandanon keyshown in the terminal, to the value ofSUPABASE_URLandSUPABASE_KEYrespectively incode\presentation\mb-client\.env.development - make sure to replace
127.0.0.1to your local ip inSUPABASE_URLincode\presentation\mb-client\.env.development -
mb-clientshould now connect to local db instead of staging db
How to change Schema
- Follow this guide to create migration for your db
- dont forget to update the seed too using
supabase db dump -f supabase/seed.sql --data-only --local
test migrations before commiting
- once you are on a happy state, where everything is working fine (wrt to the feature you are building)
- take snapshot of your db, just to be safe
- supabase db reset
- apply migrations
- check if db is on the same state as it was when you were happy
create seed.sql
- Seed is used to keep mock data, seed should only be used for local/staging server
- seed is automatically used while setting up
- old seed doesn't work with newer migrations, so whenever you migrate, generate a new seed, so that setup doesn't break for others
- seeds SHOULD NOT CONTAIN ANY PERSONALY IDENTIFIABLE DATA like email/phone number/tokens, so if seed.sql contains it, manually remove it after generating the seed file
some useful commands
# links remote to local
supabase link

# pulls remote migrations
supabase db pull

# generate new migration file with change in local db
supabase db diff --use-migra -f <name>

# fetches data form remote and saves into seed.sql
supabase db dump -f supabase/seed.sql --data-only

# fetches data from local and saves into seed.sql
supabase db dump -f supabase/seed.sql --data-only --local

# starts supabase with .env environment
env-cmd supabase start

# resets database using migrations + seed
supabase db reset

# generates types for client
supabase gen types typescript --linked > ..\..\presentation\mb-client\src\api\supabase\types.ts
No Comments